maanantai 28. maaliskuuta 2016

Kesäkortti

Paskiksen luonnos teetti vähän pohdintaa, varsinkin kun halusin käyttää pois jotain laatikon pohjalle kertynyttä. Laatikosta sattui vastaan tällainen piikkuinen tagi, jonka kuva on Ikean korttipakkauksen takapaperista. Olen tehnyt sen viime kesänä, joten joutaakin käytettäväksi! Kortin takaa vilkkuu kuori, jonka koristelin kortissa käytetyllä sapluunalla.


Taustaa rakentelin Paskiksen luonnoksen hengessä vasempaan yläkulmaan muutamassa kerroksessa. Siinä on telattua akryylimaalia, leimailua norjalaisen Rubber Dancen leimoilla (ristipistoja ja nappeja) ja tekstuuripastaa kirsikankukkasapluunan läpi. Valitettavasti pasta on läpinäkyvää (vaikka purkin kyljessä lukee "white"!), mutta se korjaantui valkoisella maalitussilla. Lisäksi liimailin pieniä laserleikattuja pikkukakkaroita... piti peittää jokunen suttu, kun olen vähän tahmatassu. Ne (kuten tagin perhonen) on ostettu Tanskasta.


Jos kiinnostaa leimaostot, niin Rubber Dancen verkkokaupasta saat 15% alennusta käyttämällä koodia kristiina2016 osstoksen yhteydessä. Tagin kiinnitin kohotarroilla taustan päälle. Näistä vihreän ja sinisen sävyistä tulee ihan kesäinen olo :)


perjantai 25. maaliskuuta 2016

From Trash to Treasure

I wanted to try some cogs I had diecut last week... Since I was planning to make a mess, I dug into the  de-stash drawer and took a miss stamped piece of card. I also ventured to something I haven't tried before... flowers! I've had a small pack of roses in a drawer waiting to be tried out, and now I'm hooked... got to get me some more :) Here's what it turned out like: quite nice, eh?


I'm posting for SanDee and Amelie's Steampunk challenge, the Country View challenge (industrial), the Things to Alter challenge (Steampunk, I hope my cardstock pieces will pass for chippies?) and the WOW challenge (anything with embossing goes). This is what I started with: a mixed media background (scrap paper glued on scrap card covered with gesso and sprays). I had stamped on it (stamps from Paperartsy), but discarded it after miss-stamping the key... it spent a few months in the drawer :)


The cogs had been die cut from thick white cardstock. They were dabbed with brown acrylic paint and heat embossed with WOW copper pearl. I adhered them to the card base and proceeded to spray with brown and black to get them to look as if they had always been there... This is the before sprays picture.

I also heated sprinkles of chunky black embossing powder (Stampendous). I wanted some of the copper too, so I made my own "chunks": I dabbed an acrylic block with embossing ink, sprinkled the powder into it and used a small brush to goo the powder into clumps. These were dropped on the card base and heated from underneath (otherwise they would fly away). The picture below shows some unmelted clumps in the foreground and melted ones near the cogs. The glued down paper pieces have boiled a bit too...


This photo has been taken in early morning light... I stamped the "smile" from Rubber Dance on a piece of cardstock and pierced through a couple of screw brads. I love how that font fits with the teeth of the cogs! Then the (rather warped) background was adhered to a 5x7 card blank with double sided tape and sewed around. 

I finished the card with a pile of goodies. The stems of the roses were twirled around a pin and I found some matching green embroidery thread. Half pearls, old mother of pearl buttons and a bronze butterfly... this won't fit in any envelope, but I love it!


torstai 24. maaliskuuta 2016

Hanki

I've been working in my art journal for the first time this year (horrible how time flies!) Luckily I ran into the Art Journal Journey page and got inspired by the March prompt "if you go down to the woods". I found myself bugged by the fact that I didn't do anything in January and February, so I decided to incorporate the January theme (Winter Wonderland) too. After all we are still in winter weather here in Finland.. at least it's not -30 anymore like it was in January :) besides AJJ I'm posting for Try it on Tuesday (Nature) the Craft Barn bi-weekly challenge (background circles) and the Paperartsy challenge (sculpting mediums... I added cheesecloth and used a combination of gel medium and matt glaze, can't talk about sculpting with my skills, but at least this is soft enough for the flaps to work!). I was inspired by the prompt post that you can find behind the link, check it out for gorgeous projects!


I guess it's quite natural that the Finnish language has more words for snowy phenomena than English... and my art journal page is about one of them. Hanki refers to the blanket of snow thick enough to cover all details of the ground underneath (at least 30 cm in my opinion). This fell upon us a month ago, and gives the proper "winter wonderland" look. This year however we have been lucky with our "hanki": the strong spring sun combined to ongoing proper frost (-10 C this morning!) has resulted in a strong crust on the snow. This is what the "kanto" refers to: the ability to carry weight. Instead of having to walk IN the snow, it's possible to walk ON the snow. Love it. Woodlands are a CAS version of themselves and all of a sudden we are not confined to the paths someone has trod, but can wander where we please :) This is typical for spring in northern Finland, but here in the south it's a rare treat that doesn't happen every year! Our little dog is head over heals. 50 cm of soft snow meant she had to "swim" in it if she jumped of the path, now that's not been a problem for the past couple of weeks.

Acrylic paints brayered over the spread. I thought of the ground under the snow waiting for spring.
Stamping with Paperartsy stamps. I decided this looked too much like autumn.
so I added flaps to the bottom of the page with white washi tape and stenciled some trees
Tissuepaper and cheesecloth to camouflage the flaps and diecut/punched snowflakes.
The dog stamped and painted with acrylic paints.
Letters stamped on inky scrap paper and fussy cut.
Some bokeh with white paint and sequins to depict the fierce spring sun.
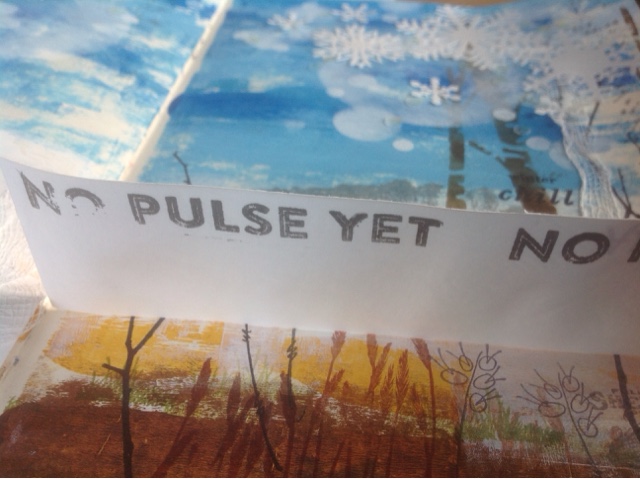
The flaps at the bottom of the page can be lifted up. I stamped "no pulse yet", because spring is still letting us wait... The underpart is quite ugly, but that's what we'll have when this snow melts!


A few closeups of the page. The dog is a stamp from VivaLasVegaStamps. I haven't used it before, the dog in the stamp is quite skinny and smooth, but I added fur with a narrow brush and acrylic paint. Looks like a border terrier in need of a trim, and that's our dog :) I would have liked to stamp her lower down on the page, but I had already adhered the cheesecloth so this will have to do. The faraway background trees are from Crafty Individuals and the letter stamps from Rubber Dance.


I'll fill in the ending date once the snow goes soft again :)


maanantai 21. maaliskuuta 2016

G is for Gundi

The Craft Barn alpha/dictionary challenge asks for G and I decided to get this done straight away! I checked my wildlife encyclopedia and picked a small rodent from the comb-rat family. Actually these live in north Africa, but here he is perched on some underpaper that is supposed to look like a rocky part of the Sahara:


Not much info on wikipedia this time, but here's a little video from the Korkeasaari zoo. I learned that the name "comb-rat" (in Finnish comb-toe-rat) comes from their back feet where they have bristles that they use to keep their fur in good shape... and they don't drink water at all, they survive on the juices they get from their veggie diet. Here is the back of my card with the short description from the encyclopedia. It was so short, I added the comb-rats family description too. It says they are able to climb up vertical rocks and are noisy, producing almost songbird type whistles! Would you have guessed?

The letter and background stamp are once again from Rubber Dance. You can find the previous alpha cards under the following links:

b (bananaquit)
f (falanouc)
l (flying dragon)
q (quelea)
r (rathbuni's salamander)


perjantai 18. maaliskuuta 2016

Paskis ATC

Viikon paskiksessa bingoillaan, ja muutaman kiireisen viikon jälkeen päätin osallistua. Valitsin rivin kraft - värittämätön leimakuva - ompeleita ja päädyin pieneen ATC korttiin.

Taustana on ruskeaa luonnonväristä silkkipaperia joka tuli juuri paketin mukana. Rutistin palan palloksi, aukaisin ja liimasin ATC korttipohjaan. Reunoille lisäsin mustetta ja päädyin myös leimailemaan kaavakuvaa ja puunsyitä. Taustaleimat, Da Vincin luonnos naisesta ja teksti ovat kaikki norjalaisen Rubber Dancen leimoja. Viimeistelin ompelukoneella, se raukka ei paljon kangasta näe :)


Jos kiinnostaa, niin Rubber Dancen verkkokaupasta saat 15% alennuksen koodilla kristiina2016 (ja yli 35€ tilauksesta ei mene postikuluja!)

torstai 17. maaliskuuta 2016

Make a Difference!

OMG it's spring! I was able to find some sunlight to take my last photos of this altered calendar :) I'm posting for the Rubber Dance March challenge (green, white and orange), the Our Creative Corner challenge (picking the theme Topsy Turvy, I used tissue paper to turn the antlers around) and the Craft Stamper take-it-make-it challenge (anything with stamping goes).


I'm working in an old calendar, altering a spread every month with the idea that I'll have a cool calendar done when 2017 arrives. The February calendar grid warped quite a bit as I worked with this, so actually that calendar grid is not yet adhered, I'll do that after I've altered the other side with April. Here are the step-by-step photos of most of the process. The stencil is from Designs by Ryn, all stamps from Rubber Dance Art Stamps, paints are Fresco Finish and Golden and I've used Micron pens for details. Here goes:

The old calendar images have been covered with gesso and I glued on some book paper with sketches
Some more gesso and texture paste through a stencil
watered down acrylic paints in yellow and green
Stamping for some texture and interest :)
Tissue paper images adhered with Satin Glaze. Still wet in this picture...
I added a flower because I didn't like the placing of the right hand side antler...
The tips of the brushes were cut up to make it possible for the bristles to separate a bit and make them look used. Well, the first one I adhered (bottom left) looks like it won't be used again :) I added my sentiment, that is built up of words from different sentiment stamps and die cut letters... and Mona Lisa got a bit of make-up too... I think she looks cute, and I'm sure she doesn't mind the antlers! 


Thanks for looking! Check the Rubber Dance website for cool stamps, free shipping if your order is at least 35€ and you can get 15% off from your order by using the code kristiina2016 at checkout.

The previous spreads in this calendar can be found here:

January
February


maanantai 14. maaliskuuta 2016

R is for Rathbuni's Salamander

The Craft Barn alpha/dictionary challenge is now asking for R. I looked through my wildlife encyklopedia and chose this blind cave salamander, that actually is really called "Texas blind salamander" if wikipedia can be trusted. Besides the Craft Barn alpha challenge I'm joining in the Craft barn bi-weekly challenge (background circles) and the Country View challenge (Industrial... not that there is anything industrial about the salamander, but the metallic background :)


I covered a piece of paper with aluminium tape and embossed it with a Tim Holtz stencil. I decided not to grunge it with anything, the shiny metal looks fun with the pink non-pigmented critter. As you can see, Finns love to combine words if they initially belong together... "rathbuninluolasalamanteri" is quite a long name but means "the cave-salamander of Rathbun (or Rathbuni)". Wikipedia didn't give a clue about Rathbuni: place or person?!? Below you can see the back of the card with the description. The letter stamp and the harlequin background stamp are both from Rubber Dance Art stamps.


The previous cards for this alpha challenge can be found here:

b (bananaquit)
f (falanouc)
l (flying dragon)
q (quelea)
r (rathbuni's salamander)

lauantai 12. maaliskuuta 2016

Bingo!

I've been playing with aluminium tape and embossing. The TH embossing folder gave really deep texture and I was super glad to find this text that suits the background. I'm posting my card for the Country View challenge (industrial), the Something to Alter challenge (Steampunk), SanDee and Amelie's Steampunk challenge and the WOW challenge (anything with embossing goes).


The aluminium tape was attached to a card and after embossing I added acrylic paints (raw umber and bone black) and light green alcohol ink. While doing the piece with the sentiment, I realized I'm going to have to by platinum embossing powder, the silver is too blue for the aluminium tape... But I have tinted it too with green alcohol ink (though I had to keep to the edges, because I had already stamped the sentiment with Stazon).  I couldn't trim the embossed card, because that would have spoiled the numbers, so I had to search my stash for a larger piece that would make it possible to mount this on a 5x7 card base. There is a skeleton leaf behind the sentiment, but it is barely visible :)


Mail Art

I knitted a pair of wool socks for a dutch boy. I had talked about this with his mom, and she wanted them sent to him (always fun for kids to get some mail for themselves!) I didn't want to write him a letter, so I decided to concentrate on the envelope. What to send a twelve year old that likes to wear a suit and hat to school everyday? I decided to go classically male... I looked through my VLVS stamps, and found a whole pile of suitable ones :) I'm really happy with how this turned out, so I am posting for the VivaLasVegaStamps March challenge (with male imagery, nature, clouds, sky-stuff, green, brown, trees and fluffy wilderness) and the Craft Stamper take-it-make-it challenge (anything with stamping goes).


It was really awesome working on such a large surface! I haven't had time to play in my art journal this year, and really should... I started by brayering Fresco Finish acrylic paints over the envelope (an old used one that happened to be lying around) and stamped it all over with Archival inks in black and grey. All the stamps are from VLVS. The upper pic is the front of the envelope, I wrote the address on the right. The lower pic is the back of the envelope. I had already written my address when I realized I had to take pictures, so I covered it with a piece of paper. I closed the envelope with some broad map-themed washi tape. I hope this arrives some time next week :)


sunnuntai 6. maaliskuuta 2016

Image transfers

I have been following the Paperartsy challenge (image transfers) posts for the past fortnight... I haven't had much time for crafting, and I don't have much of a printer either, so I already thought I wouldn't get around to anything. And then Keren Baker posted Super easy transfers, and I realized mirror stamping was just what I needed to do for the VivaLasVegaStamps challenge. So here is my card:


I used the fishing theme, water, sky and colours green and blue from the VLVS mood board and started by stamping the mirror image via an acrylic block using Versafine Onyx Black. My ink pad is new and very inky and I used a soft mouse pad under the paper but the mirror image is still quite blank. Perhaps it would have been worth while to have the acrylic block underneath and paper on top so I could have burnished the paper. Nevertheless, the vague image works well as a reflection.


I masked the boy and used the grass border for some ground and the scratchy stamp for water and sky. A black marker was used to continue the waterline, otherwise Distress inks Salty Ocean and Mowed Lawn. The result is as clean and simple as I can do without working straight on the card base... These colours are outside my comfort zone, but work well. And for once I got my VLVS monthly challenge entry done in the beginning of the month :)


Pastellisävyjä Paskikseen

Viikon Paskiksessa inspiroidutaan kuvasta. Minulle tuli siitä mieleen tällaiset taustat, jotka olen tehnyt ajat sitten Hero Artsin taustaleimalla. Ehkä mielleyhtymä tuli kolmioista, vaikka niitä ei tässä olekaan :) Värit ovat inspiskuvaa myötäileviä, mutteivät ollenkaan niin raikkaita.

Taustaleima on varmaankin leimattu Tattered Rose Distress musteella ja vesisuihkauksella. Tekstileimaan käytin vihreää (Bundled Sage) ja kirkasta kohojauhetta. Tajusin vasta jälkeenpäin, että minulla olisi ollut vihreän sävyisiä Versamagic musteita, joilla olisi ehkä tullut tasaisempi leimausjälki... Lisäksi pala pellavakangasta ja viimeistely ompelukoneella. 


Steampunk CAS

Several Steampunkish challenges going on in March, so I bought some aluminium tape and decided to try embossing with it. I made a bunch of card bases, and now the first one has turned into a card :) Posting for the Craft Barn challenge (CAS), the Country View challenge (Industrial), the Things to Alter challenge (Steampunk), SanDee and Amelie's Steampunk challenge and the Our Creative Corner challenge (Lots of options, I chose the paint-stamp-stencil row from this tic-tac-toe challenge).


I tried embossing my taped card with a stencil (from Tim Holtz). Maybe I should have put two rubber mats under the card? Not very deep embossing, so even though the pattern is visible, the acrylic paint I used to smudge over it didn't have much to stick on. Very subtle compared to embossing folders. I heat embossed a couple of dragonfly chippies and a piece of card with WOW Atlantic Seaspray and stamped on them with Stazon (text and sentiment from Rubber Dance). Also these were smudged with black acrylic paint, blue alcohol ink and some Archival ink too. I like the way this looks, great for many occasions... and now I just have to figure out what to do with the rest of my aluminium tape experiments!


The flying paint tube :)

Posting for the Craft Barn CAS challenge with this card featuring paint tubes from the Rubber Dance "Artists Plate" sheet.


Actually it is just one paint tube stamped an inch apart five times. I coloured the tubes with Derwent Inktense pencils and some water and added a pair of wings that I stamped with Distress Inks and some water. The wings were adhered to the inside of the card blank throught slots I cut with a craft knife. Calling it done! Though I have no idea what kind of a situation would call for a card like this... any suggestions?